There are several methods to uninstall the existing older versions of an application e.g. Script, MSI upgrade table, SCCM deployment conditions. We are here discussing the method using Upgrade table.
Upgrade table can be used effectively to detect and uninstall the previous versions of a MSI based application provided the upgrade code is known.
Here is an example on populating Upgrade Table:
Locate the UpgradeCode in Property Manager. Remember this could either be same or different in previous version and if it is different then grab the code from previous version.


Copy the upgrade code to its column. Populate the Version columns based on requirement (consider all the digits as per previous MSI versions).

Upgrade table can be used effectively to detect and uninstall the previous versions of a MSI based application provided the upgrade code is known.
Here is an example on populating Upgrade Table:
Locate the UpgradeCode in Property Manager. Remember this could either be same or different in previous version and if it is different then grab the code from previous version.

Go to the Upgrade Table in Direct Editor.

Copy the upgrade code to its column. Populate the Version columns based on requirement (consider all the digits as per previous MSI versions).

Attribute column needs to be configured with appropriate bit flag for corresponding upgrade behavior. Refer to Upgrade Table to calculate the proper bit flag. In example, 768 is the sum of 256+512 which means, detect the range of version including the Versionmin and Versionmax. Then specify an ActionProperty name which will be executed if version detection is successful, here specified as REMOVEOLD.
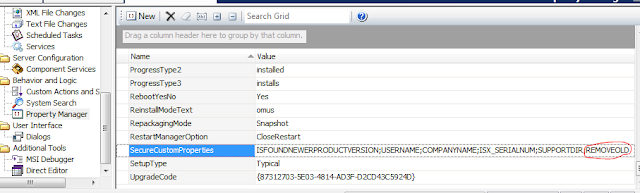
Make sure to append this ActionProperty to SecureCustomProperties filed in the Property Table as shown below.

These configurations will enable the MSI to detect existing previous version and remove it before installing itself.
Author: Dinesh Shilpakar
Remove Previous Versions Using Msi Upgrade Table >>>>> Download Now
ReplyDelete>>>>> Download Full
Remove Previous Versions Using Msi Upgrade Table >>>>> Download LINK
>>>>> Download Now
Remove Previous Versions Using Msi Upgrade Table >>>>> Download Full
>>>>> Download LINK FV